 Sometimes a piece of equipment that you thought would last for years breaks down.
Most owners are not ready for repairs at a service center due to the rather high price.
Now we are not talking about serious problems with the washing machine, but you can do some work yourself and thus save money. In this article we will tell you how to disassemble the indesit washing machine.
- Working principle of washing machines
- Dismantling the washing machine Indesit
- Let's start with choosing a place for repair
- Preparation for work
- Let's start dismantling
- Working with the body
- Turn off all electrical inside
- Removing the heater
- Remove shock absorber and tank
- Remaining works
- How to disassemble non-separable
Working principle of washing machines
A little background information to understand how this technique works. The process for all washing machines includes 5 main working steps:
- Feeding a certain amount of water into the drum.
- Heating to the set temperature and rotation at low speeds.
- Dirty water drain and clean water intake.
- Rinse and drain.
- Spinning and using high speeds.
Dismantling the washing machine Indesit
There are points that you need to know when disassembling any model of washing machine.
 First, and this is the main thing to remember - turning off the power supply and water supply.
Secondly, you need to prepare all the tools, parts that will be needed during the repair.
And thirdly, you need to know the cause and location of the breakdown.
It will take 3-4 hours of free time to work. You may need help removing the tub from the washing machine, because the process is laborious and you will need to lift about 30 kg to a height of about a meter.
Let's start with choosing a place for repair
It can be any room, with the possibility of free access to all sides of the washing machine, as well as tilting the equipment and free space for the removed tank. 2x2 space will be enough to freely disassemble indesit.
It would be nice not to stain the floor, so it is better to cover it with rags and newspapers.
Preparation for work
Before operation, remove the washing machine filter and drain the remaining water.
It’s good if you keep a photo report of the stages of your work so that you can tell others how to disassemble the indesit washing machine.
Let's start dismantling
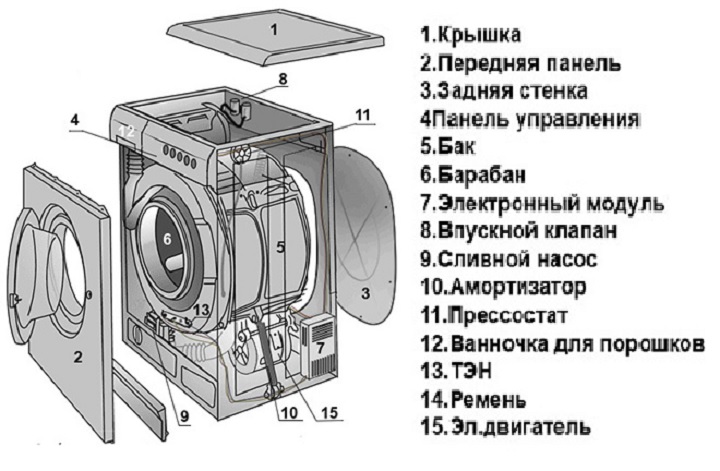
Working with the body
Need to remove the back cover
- We remove by unscrewing 6 screws. It will be nice if all the screws and small parts are folded into a box, for example. You will need tools: screwdrivers, a wrench and pliers.
- Looking under the back cover, an asterisk screw on the wheel and on the lower load catches your eye. If there is a suitable tool, these parts can be removed to lighten the weight of the tank. Otherwise, you can leave and get the tank along with them.
- Now remove the top of the washing machine by unscrewing the two screws. The cover must be pulled towards itself so that it comes out of the grooves and set aside. Three screws with 10 heads hold the top load very tightly, we also get it. You have to strain to unscrew the screws.
- We remove the front panel, which is held on by only two screws.
- Pull out the detergent drawer. You need to lift it up and pull it out, loosening it to the right and left. Three screws were found, which we also unscrew.
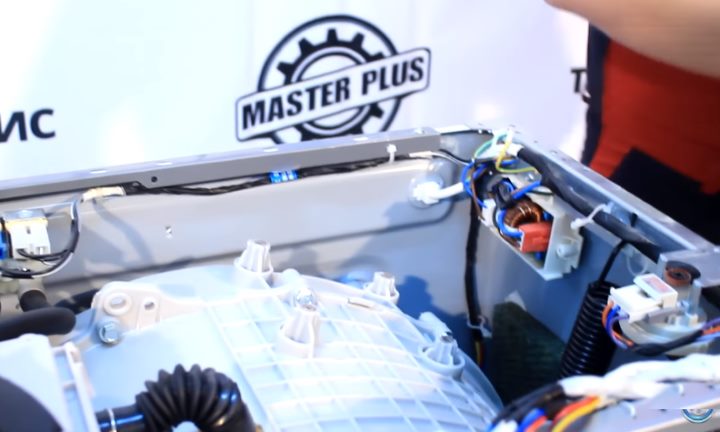
Turn off all electrical inside
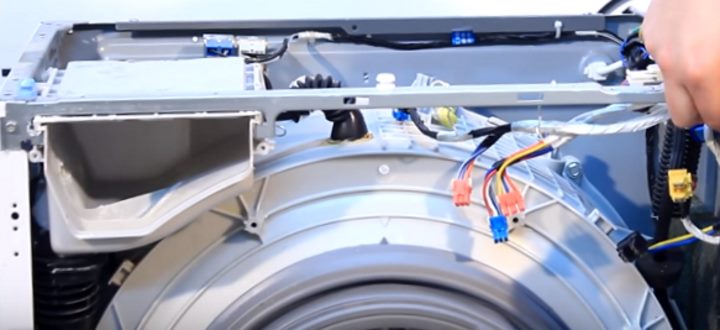
- You need to disconnect the wire going from the front panel to the board.
- The powder receptacle is a large part across the width of the entire washing machine. You will see two wires - blue and white. We disconnect them, but you need to remember which one is inserted where.
- Where water is supplied, there is a screw, which we also unscrew. A tube is attached to the bottom of the powder receiver with a rubber lug. We also remove it, for this the ear is hooked and the pipe is pulled down. Everything, the detail can be put aside.
- Now unplug the power cord. You need to find the rectangular part to which it is attached, unscrew the screw and pull it out of the grooves by pulling it up.
- Between the tank and the hatch is rubber, which rests on a spring. To remove it, just press the rubber up and grab the spring from the inside of the washing machine from above.
Removing the heater
- It is attached with clips that need to be disconnected along with the wires (wires leading to the motor, a bundle of wires under the shade).
- We unscrew the nut and take out the heating element. It happens that getting it is not very easy, as it sits very tightly!
Remove shock absorber and tank
- It's time to put the washing machine upside down. Better not completely upside down, but at an angle of about 45 degrees.
- From below, you need to unscrew the bolts on which the shock absorbers are mounted on both sides. After that, the tank is held only by the upper springs.
- We return the washing machine to its original position.
- It's time to take out the plastic tank. Help is in order, because you still need to remove the springs.
The case is small and we can assume that we managed to disassemble the indesit washing machine.
Remaining works
- We remove the shock absorbers attached to the tank on plastic pins. To pull them out, you need to slightly squeeze them with pliers.
- Next, remove the motor and rubber pipe.
- For further work with the tank, you will need to remove the lower weight.
How to disassemble non-separable
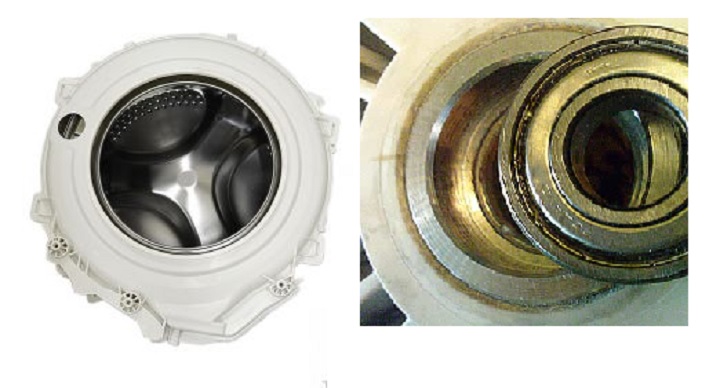
Washing machine drum indesit WISL 86
Washing equipment Indesit WISL 86 is distinguished by a non-separable tank.
Any service center will insist on a complete replacement of it, since plastic tanks cannot be repaired. And the cost of such a replacement is about 2/3 of the price of a new washing machine.
But this work is doable and you can deal with the problem yourself.
In order to carry out the replacement of bearings or seals in indesit wisn 82. How to do this, read below.
- A thin drill is taken and holes are made at the end of the seam around the entire circumference of the tank at a distance of about 15 cm.
- Then you will need a larger drill, with which you go through these holes again. This is done so that after the repair it is possible to pull the tank with screws.
- The removed tank is placed vertically, because it is necessary to cut the factory soldered seam, about 7 mm deep. This is done with a hacksaw for metal. The work requires extreme accuracy, because the wrong movement makes it impossible to glue the tank. It will take approximately 3 to 6 hours to cut. Be prepared for this.
So, the tank is cut.
Now you need to remove the back. For this:
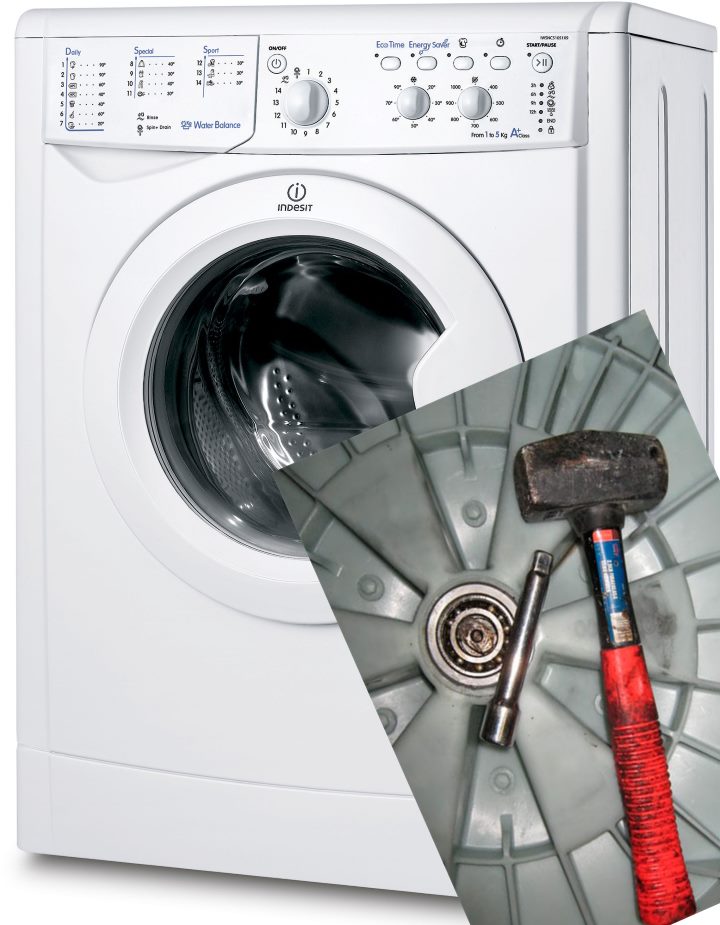
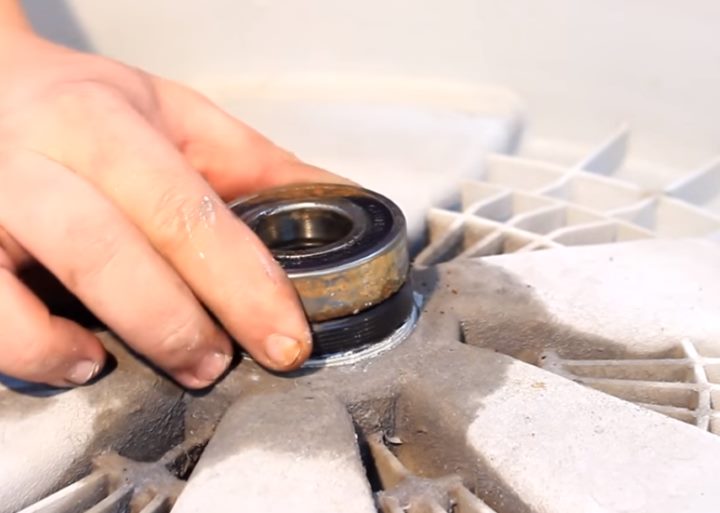
- Remove the drum pulley from the shaft, which is held on by a nut.
- With the help of a bolt and a wooden block, we hit the bolt with a hammer so that the half jumps off the shaft.
- So there was access to the bearing and seal.
- To remove the bearing, you can use an automotive puller by pulling the part off with your own hands.
You can install new bearings and seals without much effort. It remains only to assemble the tank and the washing machine in the reverse order.