 Sometimes washing machines break down, especially if they work in high load mode.
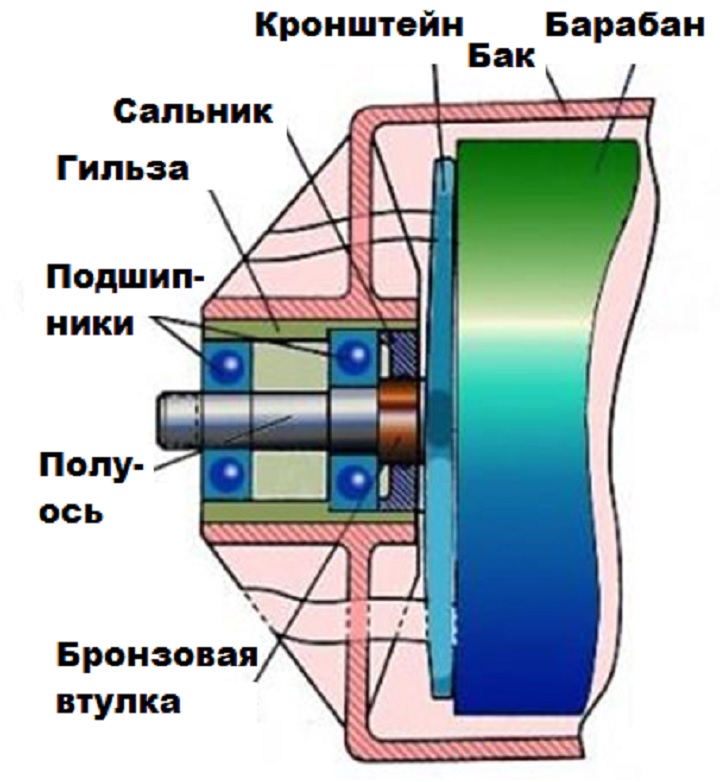
In the case when your assistant knocked, creaked, screeched and with each subsequent wash the sound intensifies, the diagnosis is clear - the bearing of the washing machine is buzzing.
This part is vulnerable and wear is not alien to it. Well, it will have to be repaired.
Solving problems with hum
There are two possible ways to solve the problem here.
- The first is a service call..
 You can also make a house call master. Of course, it will save you from a headache, but you will have to spend a certain amount on the repair of equipment.
 - The second is self-replacement.
This is more economical in financial terms, but much more laborious in terms of time. Nevertheless, replacing the bearing in the lg washing machine is not so easy, but it is feasible. Especially if you are properly prepared.
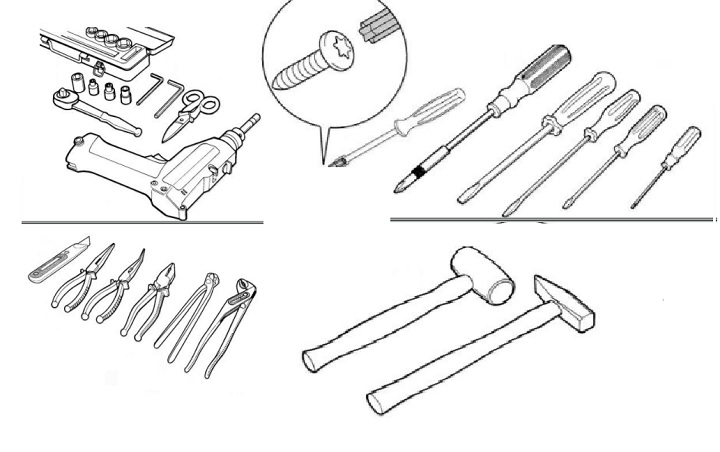
Stock up on the following.
- Tools.
 These will be pliers with screwdrivers, various keys, a chisel (punch) and a hammer, WD-40 grease and liquid soap.
 - Instructions.
In addition, perhaps an assistant who will assist in the disassembly / assembly of parts of the washing machine. - Spare parts.
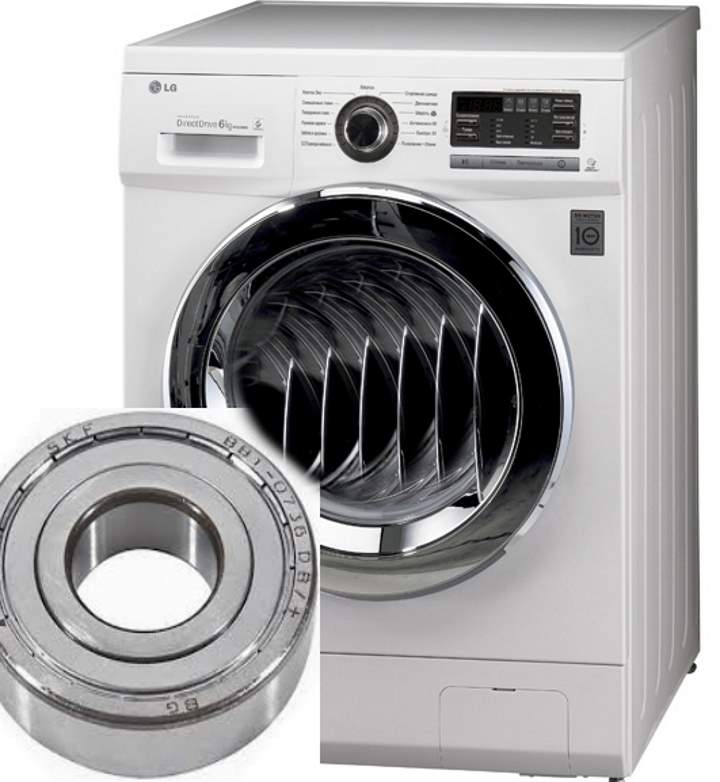
I'll have to buy a lg washing machine drum bearing and an oil seal.
Due to frequent wear, the oil seal will also require replacement.
LG washing machine bearing replacement process
How to disassemble a washing machine?
The washing unit is installed in a position with a free approach to it from all sides. The purpose of this stage of work is to get to the tank and replace the bearing.
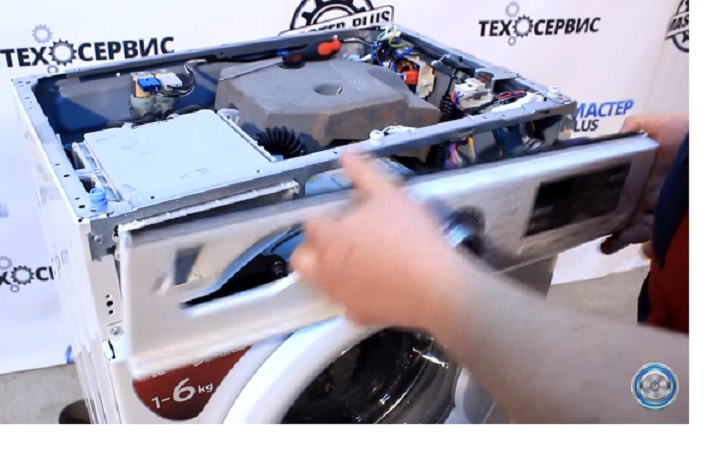 Remove the top cover. To do this, the fixing screws are unscrewed on the back wall. Now you can slide the cover towards you and lift it, it can be easily removed from the limiters.
- Detergent tray queue. You can get it by pressing your finger on the central latch, and the bolts on the side are unscrewed with a Phillips screwdriver.
 You should unscrew the holders and disconnect all the wires that are easily disengaged, you just need to squeeze the latches.
- The top cover is held on the latches on top, which are wrung out, lifted, while the panel should be slightly tilted towards itself. The wires that were disconnected in step 3 are pulled out through a special hole and the cover is quite freely removed to the side.
- Now you need to open the door and pry off the clamp spring located under the cuff (elastic band) of the drum with a screwdriver. The clamp should be pulled out, and the detached cuff should be filled into the drum.
- Attention to the castle. It has a connector on the back with wires. We disconnect them too. How? Feel for the latch and by pressing on it, disconnect the wires.
- Having closed the door and armed again with a screwdriver, we will open the cover of the service panel where the hose is located.The plug must be removed, the water drained from the hose and returned to its place.
- We proceed to remove the cover, which is held on by a screw, so it is unscrewed. Then at the top you need to unscrew the 4 screws. Attention! When unscrewing the screw at the end, it is better to hold the panel otherwise it will fall.
- Cuff. It is necessary to do almost the same as with the hatch, that is, the task is to get the fixing clamp. Again, you need a screwdriver, with which the spring is hooked and the clamp is taken out. It remains to remove the cuff.
- The heaviest part is the tank. To reduce its weight, we advise you to remove the counterweights by unscrewing the screw fasteners.
- Now you can disconnect the tank hoses.
- We remove the thermistor by depressing the connector latch.
- We got to the TEN. To disconnect the nutrients, you need to bite the screed with wire cutters. After that, the ground contacts are unscrewed.
- Pay attention to the back cover. We remove it by unscrewing the bolts.
- This stage of work involves disconnecting all elements that are associated with the tank - pipes (drain and water level sensor); screws; wires.
- The rotor is removed after unscrewing the retaining bolt.
- The stator is also removed after unscrewing the screws. The part must be tilted down and freed from the wires.
- Both shock absorbers are held on pins, so we take them out by putting on the key and squeezing the locking antennae. Now the part is pulled out with pliers towards itself. The shock absorber is unhooked and goes down.
- The front shock absorber will be removed with a spanner wrench, and the rear pin can really be pulled out with pliers.
- The last detail is the tank. It is held on the frame by side springs, which must be removed by opening the plug. The tank is lowered down and the springs are removed.
The most difficult part is over and it's time to move on to replacing the lg washing machine bearing with your own hands.
How to change a bearing?
This task will seem easy. So let's start.
- Place the drum on a high surface (default stability).
- Around the perimeter are bolts that need to be unscrewed.
- The front is removed.
- The broken part is removed. If it is not given, then after applying the lubricant, knock it out. To do this, you need to put a bar on the shaft and hit it with a hammer.
- The other half of the tank is also removed and everything that is there - dirt, scale would be good to clean with a brush. Preferably with wire.
- Gets the seal.
- Grease is taken and the bearing seats are poured.
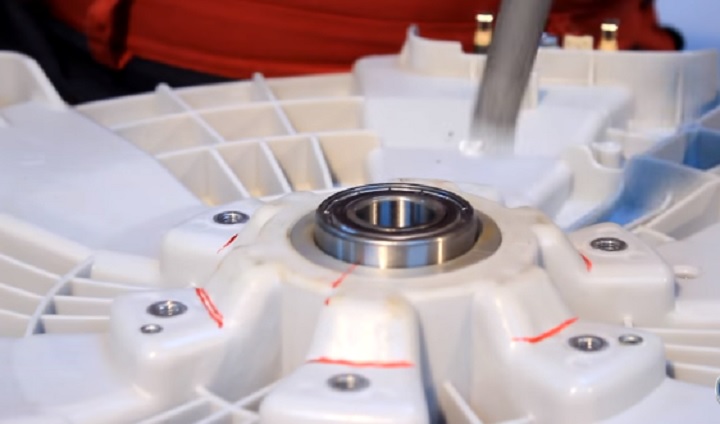 With the help of a drift and a hammer, the bearing from the bottom gets through the top.
- To get the outer bearing, you have to turn the tank over.
- Be sure to clean the seat.
- Parts that are out of order are recycled.
- Replacement parts are taken and soap is lightly applied to them.
- The bearing is inserted into the seat and upset with a rubber hammer.
- An external bearing is also inserted.
- The oil seal is lubricated with grease and soap is applied to the edges. You need to press on it with your fingers so that it is pressed.
This completes the process of replacing bearings on an LG washing machine.
The case is small - following the instructions, assemble the washing machine in reverse order.
What not to do when repairing lg washing machine bearings
To avoid problems with the repair and further performance of LG washing machines, it is necessary to take into account the errors faced by inexperienced craftsmen.
- When removing the front of the washing machine, the wires of the sunroof lock sensor often come off.
- When you try to get the cuff, the part is torn, as the removal of the clamp is often forgotten.
- A strong impact on the “stuck” screws without preliminary lubrication or heating leads to their failure.
- The wires at the temperature sensor are torn.
- The filler pipe comes off with a hose.
- The drum is damaged, which leads to its replacement.