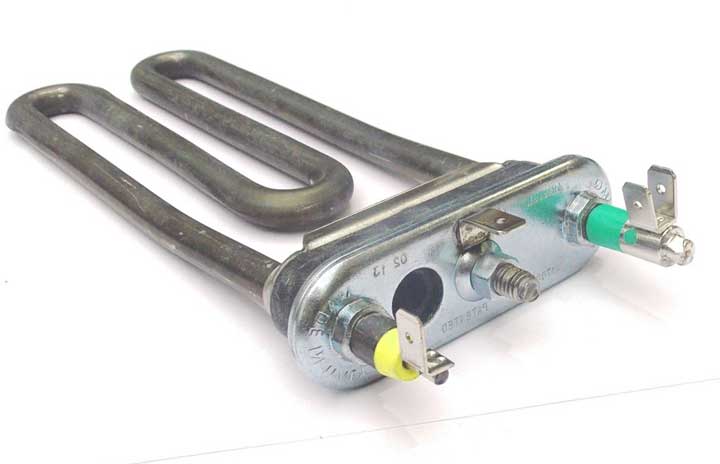
 A heating element is a device that heats water in a washing machine.
The washing process depends on the temperature of the water, the program you initially set.
It is such a device as a heating element that is able to heat the water in the washing structure to the temperature you need.
How tena works
 The water that the heating element heats can be any, for example, if the water is with impurities or hard, then during its heating it will form scale, which is capable of breaking your washing unit at any unexpected moment, provided that you do not clean it regularly.
This is not the only reason why a washing machine can fail. If you notice that water in your design does not heat up, then, most likely, your heating element has broken. It is urgent to check the heating element, and if it is broken, purchase another one.
If you want to do this without the help of masters, then for this you need to know how to change / repair the heating element yourself. Now we will tell you how to personally check the performance of the heating element, where is its location and how to understand whether it is broken or not.
Location of the heating element
 But you won’t be able to get close to it easily, although for the most part it depends on the model of your unit. For some designs, the heating element is located behind the front cover, for others - behind the back panel. There are times when the heating element is located on the side, but mostly it is for washing units with side loading.
First you need to determine where your heater is located, to do this, remove the back panel and look under tank on the presence of this device there, if it is there (it is easy to determine, because the heating element, as a rule, will be the first from the back cover and is quite easy to remove), then you need to remove it.
If there was no heating element behind the rear panel of the washing machine, then it remains to look behind the front cover. So, we have already overcome the first step. Now you need to pull out the heating element and check whether it is broken or not, and if so, then replace it.
In the future, we will tell you how to do all this in turn, and also provide two ways to disassemble the washing structure. The first method will be deployed if your heating element is located behind the front panel, and the second method when the device is located behind the back cover.
Here are a few rules that are recommended to be observed during disassembly of the structure (does not depend on the model and type of washing unit):
 When disassembling the washing machine, you need to make sure that the washing machine is unplugged, if not, then do it immediately by removing the plug from the outlet.
- Before disassembling, it is necessary to drain all the water from the tank, for this, use drain filter or otherwise use a drain hose. To drain the water from the hose, you need to lower it slightly below the level of the washing machine.
- In any case, some water will still remain in the tank, therefore, it is necessary to keep some kind of container and floor cloths nearby.

The preparatory work has been completed.
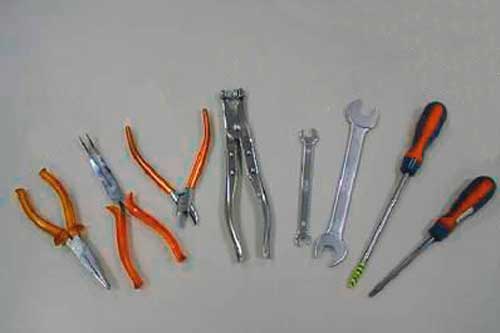 For future work, you will need the following tools:
- A set of screwdrivers (flat, Phillips, and possibly Torx);
- Wrench, can be a socket or open-end wrench in sizes 8 or 10.
As you can see, no special tools are required when taking the washing structure, and it is already becoming clear that the heating element can be repaired and replaced without any help from specialists.
TEN, which is located behind the front panel
As mentioned above, mainly in washing machines heating element located behind the rear panel. Perhaps your washing unit is from Bosh, Samsung or LG, then behind the back cover you can only find a drive belt attached to the motor.
We propose to do further work step by step:
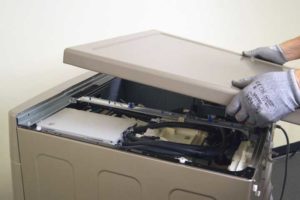 first step will remove the top cover of the washing unit. The cover is held by two screws that must be unscrewed. Their location is always at the back. The screws must be unscrewed with a flat or Phillips screwdriver, you may need a torx screwdriver (in a few cases). After unscrewing the screws, gently lift and pull back the cover and you can easily remove it.
- Second step. It is necessary to remove the box for detergents (powders, etc.). This tray will also be screwed to the washing machine with two self-tapping screws that need to be unscrewed. On the parallel side of the front panel there is a latch, pulling which you can remove the box.
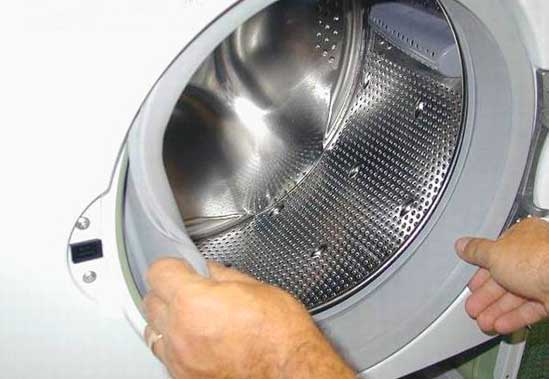
- third step there will be a moment of removal of the steel hoop.This hoop holds rubber compressor on the loading hatch. This ring tightens a simple wire spring. In order to remove the above elements, it is necessary to stretch this spring a little, and, accordingly, pull out the parts.
 Fourth step. Removing the rubber seal.
- Fifth step there will be unscrewing the screws located in front or below the front cover. When you find them and unscrew them, we proceed to remove the cover. Be careful and attentive when preparing to replace the heating element in the washing machine, because the cover can be fastened not only with bolts and self-tapping screws, but also with clips. Therefore, it is better to remove the cover as follows - just bring it forward a little, and then lower it down.
- sixth step. Not far from the hatch is a door blocker. There is no need to unscrew and remove it, you just need to disconnect the wires. Now it is possible to remove the cover and proceed to the removal of the heating element.
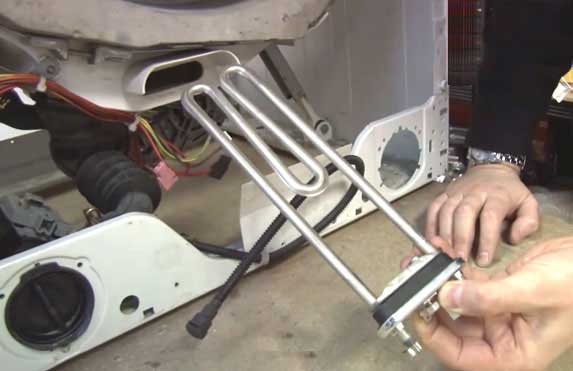
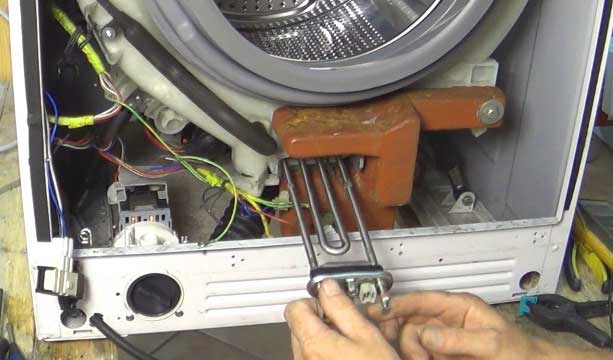
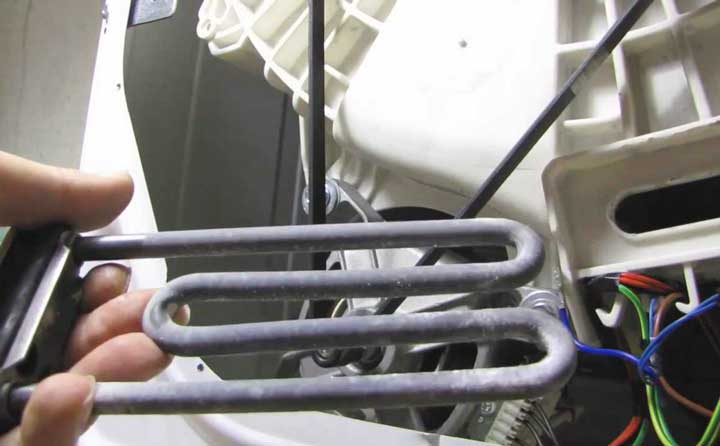
- seventh step. The heating element is located at the bottom of the tank. At the end of this device, you can see a ground wire, power terminals (two pieces), as well as a connector for a temperature sensor.
- the eighth step there will be a removal of the terminals, disconnection of the ground and removal of the temperature sensor. If you want to connect everything correctly and successfully in the future, then it would be best for you to remember the locations of the disconnected wires, write them down or take a picture.
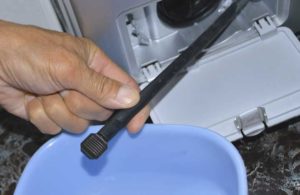
- Ninth step. All that remains is the nut, which must be unscrewed with a wrench (open-end or socket). It is not necessary to unscrew the nut to the end. Slightly press the bolt inward, after which you can remove the heating element.
 tenth step. To remove it, simply wiggle it up and down and then carefully remove it.
- Eleventh step. Required tank prevention. To do this, simply clean the tank of scale, detergents and other debris. Now let's move on to the main, replacing the heating element.
- Twelfth step. Purchase a new heating element in advance (we advise you to build on the model that you had initially). Insert a new device after connecting a thermal sensor to it. If there are guides, then you need to get into them and also push them inside the heating element. After that, screw the nut back, while attaching the remaining wires to the heater, use the photo that will show how everything was in the place of the last heater (The photo is discussed in the eighth step).
- Last, thirteenth step will be the reverse assembly of the washing unit.

Well, that's all, we replaced the heating element in the washing machine. Fasteners can be located in absolutely different places, but this does not change the principle of operation.
TEN, which is located behind the rear panel
Washing structures manufactured by Indesit and Whirlpool and other similar models are disassembled from the back. Such options are simpler, optimal and faster.
We will provide you with a step-by-step work on replacing the heating element in the Indesit washing machine with a back cover:
 First step. Turn the washing machine with the back cover towards you.
- second step the unit will be disconnected from the network and the water will drain.
- Third step. Unscrew the screws with screwdrivers and remove the back cover.
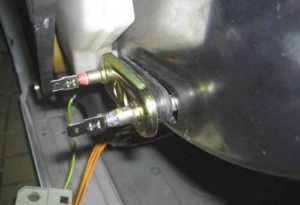
- Fourth step. We immediately see our heater, it remains only to disconnect the wires.
- Fifth step if the nut is unscrewed (also with a socket or open-end wrench) not completely, push the bolt inward and carefully pull out the heating element.
 the sixth step there will be a removal of the sealing gum, it will interfere with you and prevent you from pulling out the part, so loosen it a little and gently pull it out.
- Seventh step. It is necessary to prevent the tank, during which you clean it from unnecessary debris, powder and scale, and then
 replace the old heater with a new one. The sealing rubber can be lubricated with dishwashing detergent before insertion, this is necessary so that the device enters freely.
 - eighth, and last step there will be a wire connection. Then screw the back cover back on and turn the washing machine towards you with the front panel. Connect the unit to the network, having previously installed all communications back. Check the design for functionality.

This is the end of our article. Once replaced, your washing machine is ready to take on new heavy laundry tasks. The process of replacing the heater device itself is quite fast and not very difficult, as it might seem at first glance. You can not be afraid, and feel free to take the necessary tools to disassemble your structure.
+ how to remove the heating element + from the washing machine indesit
+ how to get a heating element + from the washing machine indesit
+ how to replace a heating element + indesit in a washing machine
+ how to change the heating element + indesit in the washing machine
+ how to check the heating element + indesit on the washing machine
+ how to remove the heater from the washing machine indesit
where to buy heating element + for washing indesit
where to buy heating element + for washing machine indesit
heating element replacement + indesit in washing machine
indesit washing machine heating element replacement price
buy heating element + for washing machine indesit
buy heating element + for washing machine indesit
heating element + for washing machine indesit
connection of heating element + in the washing machine indesit
change heater
checking the heating element of the washing machine indesit
washing machine heater relay indesit
how much does a heating element cost + for an indesit washing machine
removal of heating element + indesit in the washing machine
resistance of the heating element of the washing machine indesit
washing machine indesit wisl 103 ten
washing machine indesit where is the heating element
washing machine indesit heater replacement video
washing machine indesit remove heating element
washing machine indesit heating element replacement
heating element cost + for indesit washing machine
ten indesit
heating element + for washing machine indesit
heating element + for washing machine indesit + in tambov
heating element + for washing machine indesit
heating element + for washing machine indesit wisl 102
heating element + for washing machine indesit wisl 105
heating element + for washing machine indesit perm
heating element + for washing machine indesit price
install heating element + indesit washing machine