 One of the best helpers in the house is the washing machine. She facilitates the work of a woman, frees her at least from washing. If the family is large, then you have to wash every day to keep the apartment clean and the hygiene of its residents. Therefore, the breakdown of the washing machine is a real problem for a woman.
The whole laundry is a heavy burden on her shoulders. And all this linen, clothes, the hostess begins to wash by hand, wasting time and effort. And so every day, dreaming about a new washing machine or about repairing the old one as soon as possible. And there is no money for repairs.
What then to do? You need to get out somehow. If the husband is with hands and head, then he will be able to independently find the cause of the breakdown and replace the faulty part with a new one. Today we will talk about how to disassemble the Lg washing machine and any other model.
Washing machine disassembly tools
Washing machine brands differ from each other by some features: washing programs, sizes, number of revolutions, but the principle of disassembling washing machines is the same.
For high-quality and fast disassembly, you need: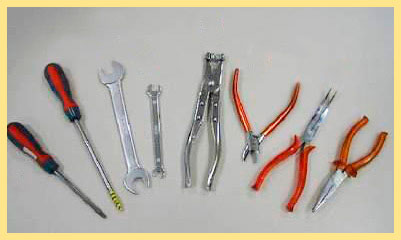
- two screwdrivers - thin flat and Phillips for unscrewing the fasteners;
- round nose pliers or pliers;
- awl;
- a hammer;
- spanners and socket wrenches;
- ticks;
- wire cutters.
How to disassemble the LG washing machine with your own hands
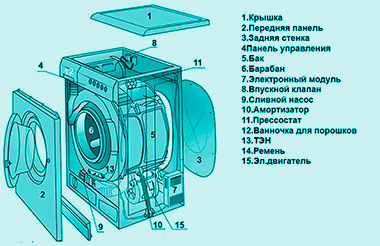
The internal parts of the device are protected from the negative effects of the environment by the metal elements of the case: the back wall, the front panel, the top cover.
- Before you start disassembling the washing machine with your own hands, you need to unplug the cord from the outlet to de-energize it, protecting yourself from electric shock. Shut off the supply of cold and hot water.
- Unscrew the two screws at the top, then pull the top cover slightly towards you, lift it up and remove it. Behind each Lg washing machine there is a service hatch, which is almost the size of the back wall. Therefore, in order to get to the parts of the device located under it, you can not remove the wall, but unscrew the fasteners of the service hatch around the entire perimeter and remove it.
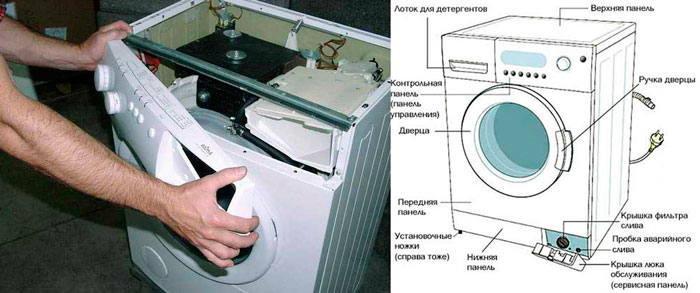
- Next, you need to remove the control panel so as not to interfere with disassembling the unit. To do this, pull out the detergent drawer. Under it are two screws, unscrew them with a Phillips screwdriver. Then take a flathead screwdriver, pry the top latches holding the control panel with it and remove them. They will make a small click. Then disconnect the lower latches until they click by pulling the panel towards you and lifting it up. You can not completely remove the control unit, but move it to the side panel and fix it with adhesive tape.
- Extract drum cuff. To do this, open the door, press the clamp spring and pull it off. On the model of the Lg washing machine, there is only a spring that holds the cuff, there are no tricky latches or teeth. Hide the rubber band far inland by removing it from the door.
- Open the hatch that hidden filter. Bite off the bolts on the right and left of the filter and remove the front bottom panel, which is called the bezel. Now nothing prevents you from removing the front wall: neither the control panel, nor the cuff, nor the door.
- Unscrew the bolts at the bottom and top of the front wall. It has a hatch lock that is connected to the rest of the washing machine. Insert your hand between the front panel of the device. Through this gap we can get the wire and pull it out. Another option is to unscrew the hatch lock from the front wall.
- How to disassemble the pump of the washing machine Lg
To do this, put the device on its side and remove the pump through the bottom, after disconnecting the wires from it. To pull out the drain pump, you need to unscrew the screws and disconnect the clamps. To do this, press the latches with pliers and disconnect the drain hose and pipe.
You need to disassemble the pump from the snail by unscrewing the screws on it. Clean the snail from dirt and mucus.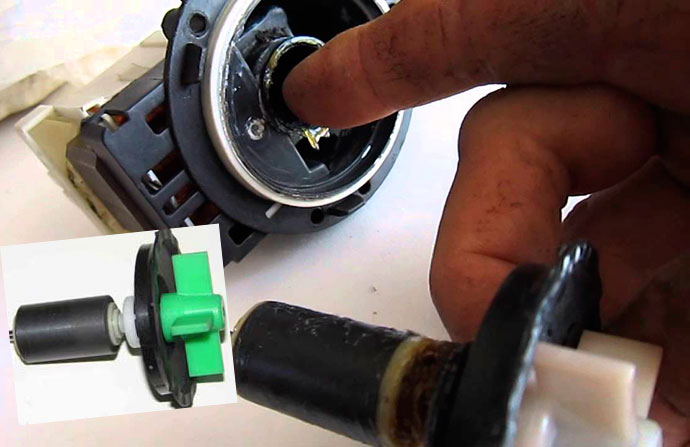
Pay attention to the impeller, turn it on the shaft, whether it rotates, whether it is damaged. If it is broken, replace the impeller with a new one.
Also check the rubber gaskets. If the gasket is cracked or torn, replace it. Next, pry the latch with a screwdriver and remove the motor from the coil. Remove the monolithic cross by heating it with a building hair dryer. Then pull the magnet off the shaft.
After that, clean all parts of the pump, remove dirt, check the bearing. Lubricate it. If broken, replace. Start reassembling from the photo you took before disassembling the drain pump.
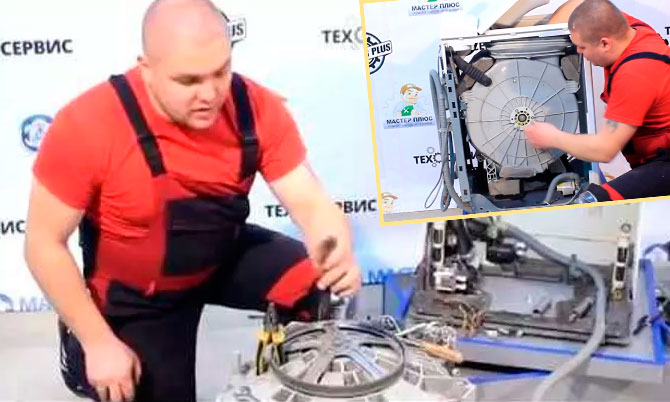
How to disassemble the loading tank of an Lg direct drive washing machine
So, we removed all panels: front, back and top cover, control module.Now we will tell you how to disassemble the loading tank of the Lg direct drive washing machine.
This work in the service center is the most expensive, because the washing machine must be completely disassembled. The bearing and seal are located at the rear of the tank. To find out if the bearing is faulty or in order, turn the drum by hand.
If you hear a creak and rumble, then the bearing is not working, it must be replaced.
As soon as you buy Lg, you immediately need to install the washing machine on a flat surface, adjusting it in level so that there is a uniform load on the bearings. If you see a leak at the back of the tank, then the oil seal has become unusable.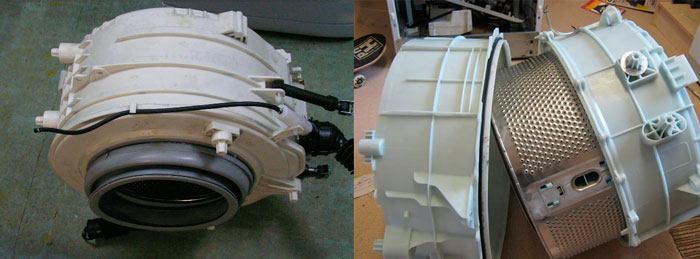
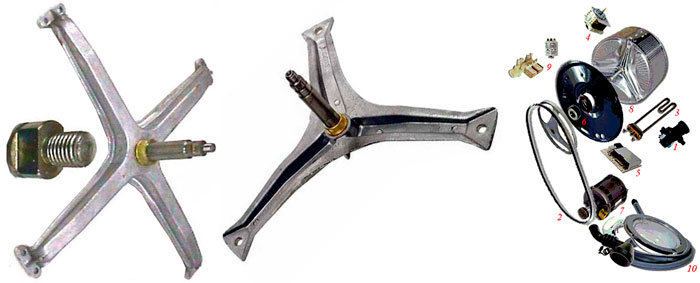
To get to the bearing, you need to completely disassemble the drum. You need to replace the part with a new one of this particular model. You can’t take the bearing from other washing machines, because it won’t fit. When buying it in a store, pay attention to the integrity and quality of the part.
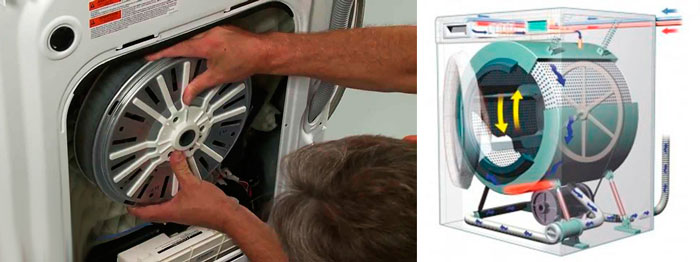
Direct drive, or Direct Drive, is a new technology used by the Korean company Lg. Thanks to it, the life of the washing machine is longer, because it does not have a drive belt.
The machine is quiet. In washing devices of this brand, the engine is located behind the loading tank, and not at the bottom, like other devices.
- To remove the drum without difficulty, you need to remove the counterweights. Loosen the bolts at the upper counterweight, remove it, do the same with the lower counterweight.
- The hoses are at the top of the tank. They need to be removed. Loosen them with a Phillips screwdriver. After loosening the clamps, disconnect the hoses from the tank.
- The bottom of the tank must also be disconnected thermistor. Press the latch of the connector, remove it.Take the wire cutters and use them to cut the tie connecting the thermistor to the wires going to the heating element and the ground contact.
- The grounding contact is fastened with a nut by 10. Unscrew the contact with a head by 10.
- From the tank of the washing machine, disconnect all parts of the washing machine that fit it, as well as the wires of the heating element, drain pump, engine. Pull out the terminals with which the sensors are connected to the loading tank and remove them.
- Disconnect the pipe from the water level sensor and the pipe drain pumpso that they do not interfere with removing the drum. To do this, use a Phillips screwdriver to unscrew the clamp that holds the pipe to the tank. After loosening the spin, disconnect the pipe from the tank. These pipes connect the loading tank to the rest of the device.
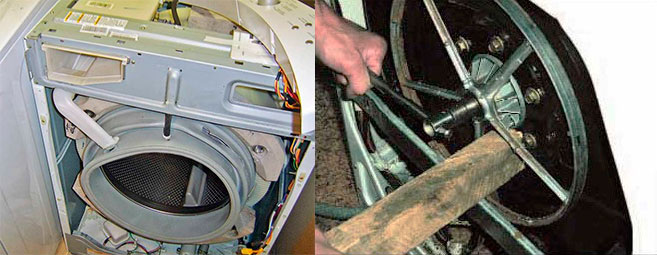
- Loosen the screws that secure the pressure sampling chamber. Next, unscrew the head on the 16 nut tightening the rotor. It must be held at the same time, because the bolt is untwisted with difficulty. If in this case you were unable to unscrew the bolt, ask someone to hold the drum inside.
- Remove the rotor. Under it is the stator, which is bolted with several bolts. Take the head on 10 and turn each of them out.
- When you unscrew the last bolt, hold the stator so that it does not fall and be damaged. Remove the stator by lowering and tilting. Disconnect the connector retainer and then the connector. Remove them from the stator. Now the tank and drum are not connected to anything, but are on shock absorbers and springs.
- Now you need to remove the pins that hold and connect the shock absorbers. They have 2 locking antennae. Take the head at 13 and put it on the pins so as to compress these antennae. Then pull the pins out with pliers. The shock absorber can now be removed from the tank.
- Then remove the springs.They have a cap that prevents them from jumping off the loading tank. Use a flathead screwdriver to pry off the plug and then remove the springs.
- Disconnect the loading tank from the springs and lay it with the pulley up. The engine was removed along with the tank.
- Open the motor. Pull out the tank.
- Lay it on wooden blocks with the pulley up and unscrew the bolts with a 10 head. Now one half can be lifted easily. Use a screwdriver to release it faster. Inspect the top half of the tank for cracks or chips. If they are, then the upper part of the tank can be replaced. Try to pull the drum out of the second half of the tank. If it does not come out, then turn the tank over and knock the drum out of it. Perhaps a bearing is stuck in it and prevents the drum from leaving the tank.
- To do this, place the upside-down tank on wooden blocks with the plastic part to hit the drum shaft. Before this action, pour penetrating lubricant into the seat, and let it soak for a while - 1 minute.
- Take a wooden block, put it on the shaft so as not to damage it when knocking with a hammer. Hit the tree and shaft with a hammer. The drum will pop up.
- Remove the other half of the tank. Consider drum. If it's OK, then put it aside, we don't need it yet.
- Turn the half of the loading tank upside down and use a flat screwdriver to pry the stuffing box out of it.
- Remove dirt. Then lubricate the edges of the bearing with penetrating grease over the seat to make it easier to dislodge. Excess oil must then be removed so as not to weaken the material of the tank. Hit the bearing, first the bottom one, with a hammer. Then turn the tank over and knock out the other bearing from the back.
- When the bearings come out, use a nylon or brass brush to clean the seat of dirt.Do not use a metal brush for this purpose, because it will damage the tank. Before putting the bearings in place, coat the edges with liquid soap to make them easier to install. Put the new bearings in place and tap them with a hammer.
We told you how to disassemble the loading tank in order to replace bearings and oil seals, how to remove the drain pump from the washing machine, disassemble it and clean it. Now you know how to repair the device so as not to pay a lot of money for a complete disassembly of the washing machine and its restoration.


Skis 12 kg true steam, how to remove the engine (drip)